Make a VRM avatar from an AI image — Tripo to VRM 1.0, no Blender
Image generators and 3D generators have closed most of the distance between an idea and an avatar. The part they leave open is the face: a Tripo or Meshy export arrives rigged to walk, wave and turn its head, and completely unable to speak.
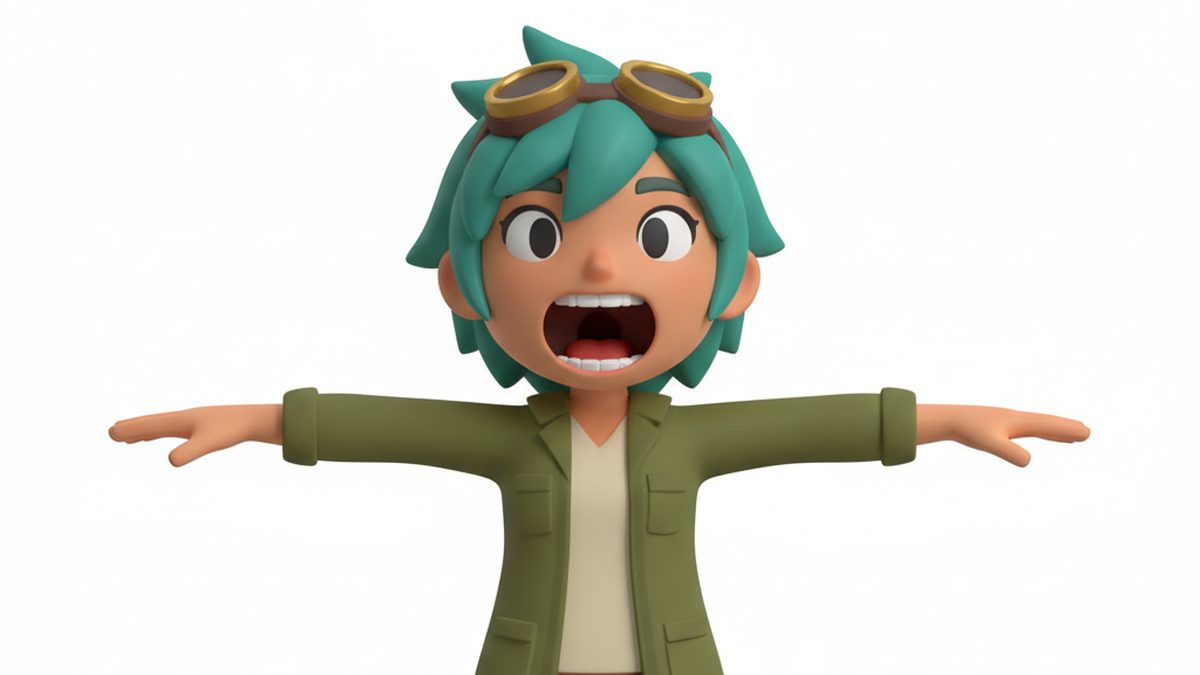
To make a VRM avatar from an AI image: generate a full-body character reference with the mouth open, turn it into a rigged 3D model in Tripo (generate, texture, Auto Rig with the humanoid model, then export GLB with the skeleton included), and upload that GLB to Riggle, which converts it without Blender, Unity or UniVRM. About twenty seconds of marking - trace the lips, click inside the mouth, tag the upper and lower lip, click each eye - and you get back a VRM 1.0 carrying the five visemes (aa, ih, ee, oh, ou), blink with independent blinkLeft and blinkRight, happy, angry and surprised, plus a video of every expression playing back so you can check the face before you download it. Most of the elapsed time is Tripo thinking. The decision that matters most is made in the first minute, in the prompt: generate the character with its mouth open.
Why an open mouth decides your visemes
Almost every guide to this pipeline treats the image prompt as the fun part and the rigging as the hard part. It is the other way round. The prompt is where you either create or destroy the geometry the face will later need, and you cannot tell which you did until two steps later.
Here is why. Riggle builds its best visemes out of the mouth your model already has: it finds the lip ring, seals it shut along a solved seam, and bakes that closed mouth as the resting face. The aa viseme is then not a deformation at all - it is your model's own open mouth coming back, with real teeth and real depth behind them. Every other viseme is a fraction of that same motion.
A character generated with its lips closed has no cavity to reopen. Riggle still rigs it, and the visemes still work, but they are a procedural approximation of an opening that was never modelled - and on continuous geometry there is no falloff that reliably separates a lower lip from a chin, which is why the mouth can end up dragging the jaw with it. No amount of marking afterwards invents the missing teeth and tongue.
It costs nothing to get this right. It costs a full regeneration to fix.
Step 1 - prompt a character a 3D generator can use
Any competent image model will do, and the art style is up to you. Four things are not: a full-body front view, arms out from the body, a plain white background, and a mouth open wide enough to see inside. Everything else in the frame becomes geometry - a cast shadow becomes a mesh, a held prop becomes part of the hand, a cape fuses to the back and gets skinned as body.
This prompt produces a usable reference on the first try. Replace the character line and leave the rest alone:
Full-body character reference of a single stylized 3D game character, front orthographic view, arms held straight out to both sides at shoulder height, palms facing down, legs shoulder-width apart, feet flat and pointing forward.

THE MOUTH IS WIDE OPEN. The jaw is dropped in a rounded "aah" and the inside of the mouth is clearly visible: upper and lower teeth, the tongue lying on the floor of the mouth, and the dark throat cavity receding behind it. The opening must read as a real hole with depth, not a flat painted shape on the face.

Character: [your character here - hair, skin, outfit, proportions]. Simple clean shapes, readable flat colours, matte materials, no fine surface noise.

Lighting: soft even studio light from the front, no cast shadows, no rim light, no perspective distortion. The whole body is inside the frame with a small margin.

Background: pure flat white and nothing else. Nothing crosses or hides the silhouette - no cape, no long loose hair over the shoulders, no held props, no floor plane, no drop shadow.
Two details worth keeping even though they look fussy. Arms out gives the auto-rigger a clean left/right axis to measure and gives Riggle a sane pose to correct from; arms hanging at the sides make both jobs harder. Eyes open and visible matters because you will click their centres later - painted-on eyes with no lid geometry are fine, they just blink by squashing the eye patch rather than closing a lid.
Step 2 - generate, texture and auto-rig in Tripo
Upload the reference to Tripo Studio and work through the panel in order: generate the mesh, add the texture, then open Animate and run Auto Rig. Pick the humanoid rig model rather than the animal default - robots, goblins and monsters all count as humanoid here, because what matters is that they are bipedal and roughly T-posed.
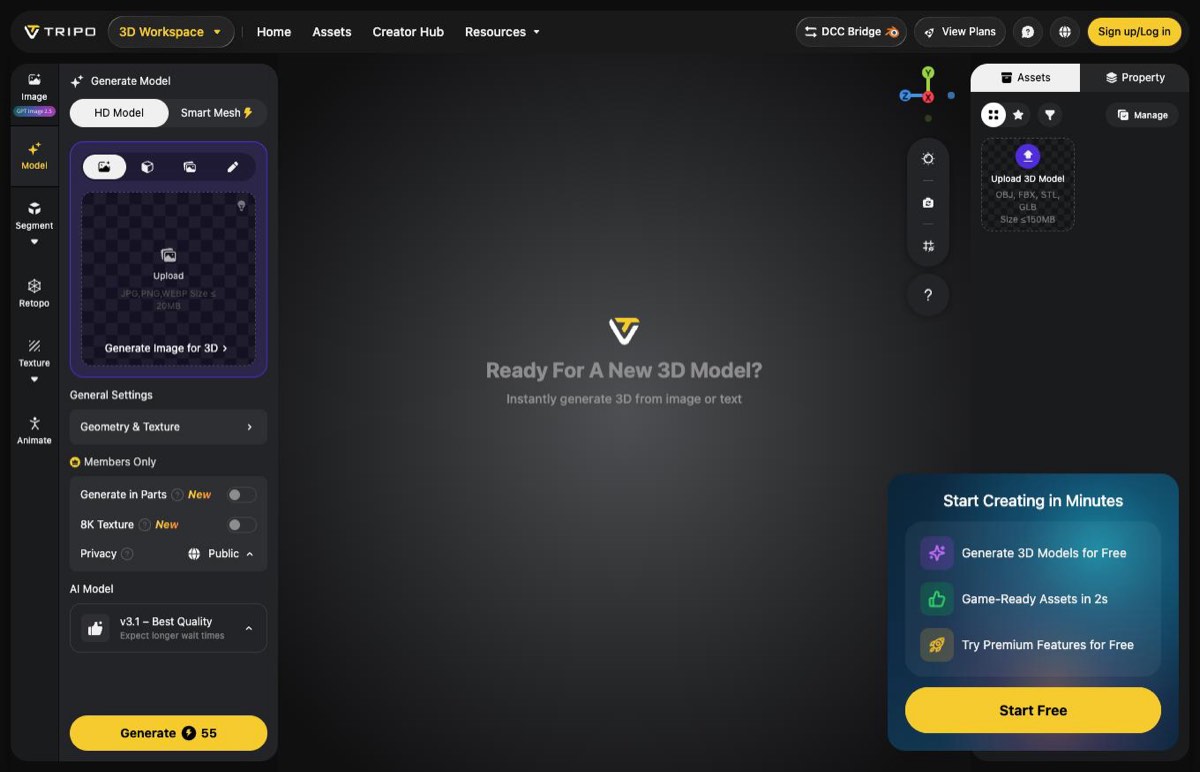
Keep the polycount modest - around 15,000 triangles is plenty for an avatar and keeps the face clean enough to mark. Then export as GLB with Export Skeleton turned on. That toggle is the one people miss, and a GLB exported without it is a statue: Riggle maps skeletons, it does not create them.
What lands in your downloads is a textured mesh with roughly forty named humanoid bones, one skin, no animations and - the part that matters - zero blendshapes. The body is finished. The face is frozen. That is the gap the next step fills.
The same applies to a rigged export from Meshy, a Mixamo auto-rig, a VRoid model or your own Blender rig. Riggle recognises the common bone-naming conventions and falls back to matching by shape when it meets one it does not know.
Step 3 - convert the rigged GLB to a VRM 1.0
Drop the GLB into Riggle. It normalises the scale to human height, corrects which way the model is facing, bakes an A-pose into a T-pose, maps the skeleton onto the VRM humanoid bones and renders a straight-on view of the face - a few seconds, and then it hands the job to you.
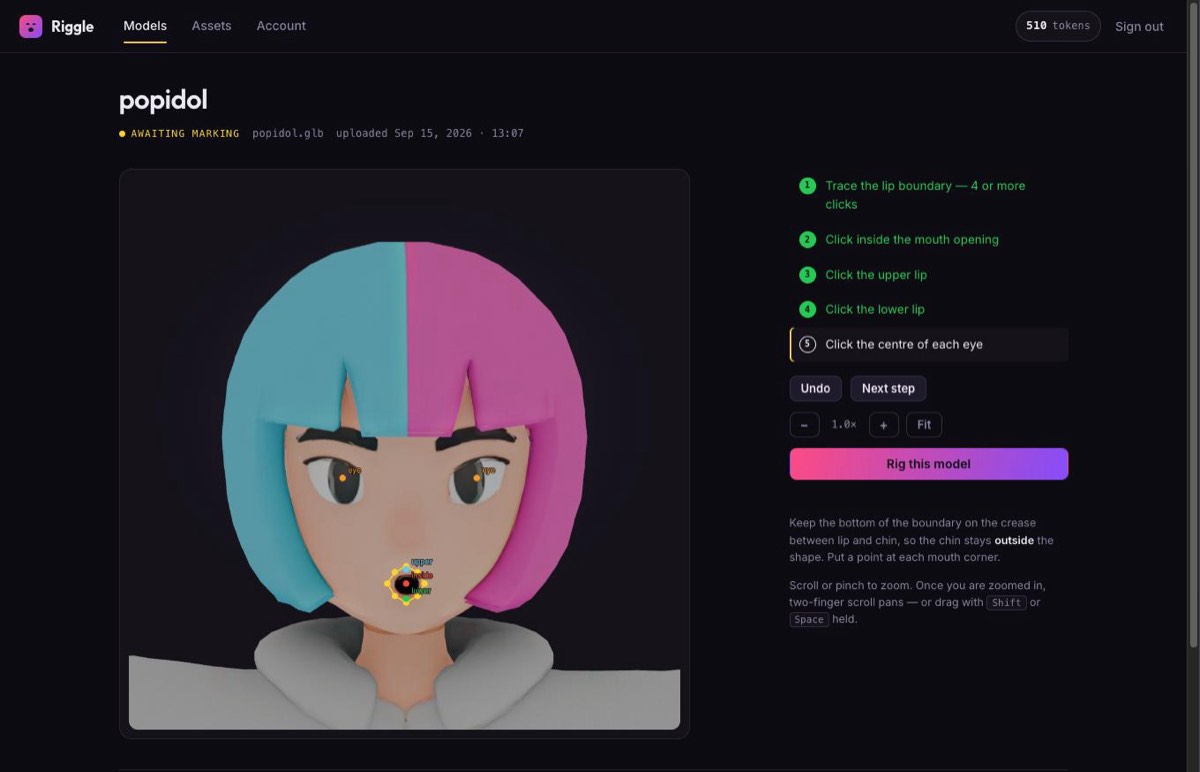
Five steps, and the canvas advances itself after each one:
- Trace the lip boundary - four or more clicks around the lips, with a point at each mouth corner and the bottom edge sitting on the crease between lip and chin, so the chin stays outside the shape.
- Click inside the mouth opening - the seed the lip mask grows from.
- Tag the upper lip - one point anywhere on it.
- Tag the lower lip - the pair tells the solver which rim moves which way.
- Click the centre of each eye - this pins the blink anchors exactly instead of leaving them to automatic detection.
Then press Rig this model and wait about a minute. Nothing else is asked of you.
What the VRM 1.0 contains, and how you know it worked
A VRM 1.0 file with the humanoid skeleton mapped, the rest pose corrected, the height normalised, and the expression set bound: five visemes, blink plus independent left and right, happy, angry and surprised, and eye-bone look-at when the source rig has eye bones to drive.
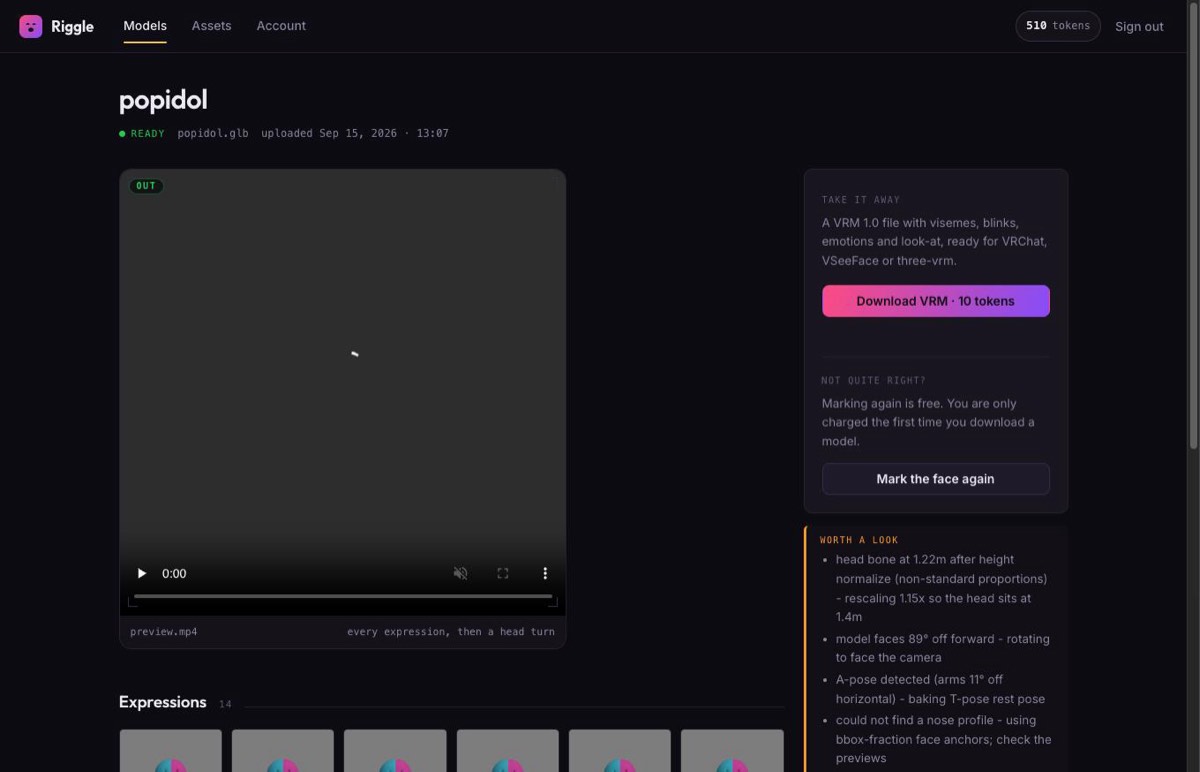
You do not have to take its word for any of it. Riggle loads the finished VRM in a real renderer, drives every expression, and compares each frame against the neutral one - an expression that technically exists but does not visibly move gets flagged rather than quietly shipped. You get fourteen stills and a video of the whole set playing back, on the page, before you spend anything. The same panel lists in plain sentences what the pipeline corrected: the rescale, the facing, the A-pose bake.
If the mouth is not opening as far as you would like, mark it again with a slightly wider lip boundary. Re-rigging is free and unlimited - you are only ever charged the first time you download a given model.
Coming from Meshy, Mixamo or VRoid instead
Tripo is the path shown here because it goes from one image to a rigged, textured humanoid in a single sitting. It is not the only way in, and the rest of the guide is unchanged whichever you use.
- Meshy - generate and auto-rig, then export GLB. Meshy's own documentation sends you to Blender and UniVRM from here; this is the step that replaces both.
- Mixamo - upload your mesh, take the auto-rig, and download FBX. Convert the FBX to GLB first (Blender's exporter or any glTF converter will do) and upload that.
- VRoid Studio - already exports VRM, so there is nothing to convert. Upload the .vrm directly if you want Riggle's visemes on top of what VRoid gave you.
- Your own rig - any humanoid skeleton works. Riggle recognises the common naming conventions and falls back to matching bones by shape.
What all of these have in common is the thing they leave you with: a body that moves and a face that does not. The conventional fix is Unity plus UniVRM plus a day of reading. This is the same destination reached from a browser tab.
What it costs
Uploading, marking, rigging, the previews and the video are all free, however many times you do them. The only thing that costs anything is downloading a finished VRM, at 10 tokens, charged once per model.
- Free - 10 tokens a month, so one finished avatar every month, downloaded and yours.
- Pro, $4.99/month - 50 tokens a month, five avatars. $49.99 a year if you would rather not think about it.
- Token pack, $9.99 - 75 tokens, good for a year, for the month you finally finish the whole cast.
Tripo bills separately for the generation step, in its own credits - budget roughly 65 to 75 of them per character depending on which path you take through its interface.
Bring your generated character to life
You have the image and the rigged mesh. Twenty seconds of marking turns it into a VRM 1.0 that speaks, blinks and reacts - previewed in full before you download it, and free for your first model every month.
Rig my modelFAQ
Can I use Meshy, VRoid or Mixamo instead of Tripo?
Yes. Riggle takes any rigged .glb, or an existing .vrm you want re-rigged, up to 100 MB. Tripo is used here because it goes from a single image to a rigged, textured humanoid in one sitting, but a Meshy export, a Mixamo auto-rig, a VRoid model or your own Blender rig all work the same way.
What if my character's mouth is closed?
It still converts. Riggle carves a mouth from the surface instead of reopening one, and you get a working set of visemes - they are just softer and less convincing than the ones built from real cavity geometry, because the teeth and tongue were never modelled. If you can regenerate the character, regenerate it with the mouth open. If you cannot, mark it and judge the preview.
Can I convert a GLB to a VRM without Unity or Blender?
Yes - that is what this does. The conventional route is to import the GLB into Unity, install UniVRM, configure the humanoid avatar and the expression clips by hand, and export. Riggle does the conversion in a browser: upload the GLB, mark the face, download a VRM 1.0. Blender runs on our servers, and you never install or open either tool.
Do I need Blender or any 3D software?
No. Upload, five marks and download all happen in the browser. Blender does the real work on our servers; you never install or open it.
Does the character have to be humanoid?
It has to be bipedal with a recognisable humanoid skeleton - two arms, two legs, a head on a neck. Robots, goblins, monsters and stylised animals on two legs all qualify. A quadruped or a floating blob does not, because VRM's humanoid bone map has nowhere to put it.
How long does the whole thing take?
The image is instant, Tripo's generate-texture-rig sequence is a few minutes of waiting, marking the face is about twenty seconds of clicking, and the conversion itself usually finishes in under a minute. Most of the wall clock is Tripo, not you.
Can I stream or sell with the avatar?
The VRM is yours; Riggle claims nothing over what you convert. What governs commercial use is the licence of whatever produced the source model - Tripo, Meshy and the rest each set their own terms - so check those before you monetise a character.
Will the VRM work in my VTuber app?
Check which VRM version it reads. Riggle exports VRM 1.0, which any three-vrm based app loads as-is, but some VTuber software still expects the older VRM 0.x and will refuse a 1.0 file outright. If yours is a 0.x app, you will need a conversion step between the two versions - so it is worth checking before you plan a stream around it.